{Lily} Lily's Birthday

My little girl turned 3 and so we had to celebrate!


The collages were all made with PicMonkey.

{Life Lately} Local Yard Art

As we continue to work on our yard, I can't help but think that our yard needs some personality with some yard art.

Last week, my parents took us out to eat for Lily's birthday. After dinner we went on a walk around the neighborhood and saw some great pieces.
This could easily be made using old vases, glass bowls and plates. I may attempt this later this summer.
At first we thought this was a crocodile but soon realized it's a hippo! We love hippos in this family and so we had a special spot in our little hearts for this guy.
We love Buddhas more than hippos (at least I do) and so this guy was just awesome.
This yard had gorgeous plants, the Buddha and the hippo. My mom said we needed to meet the people who lived there. I wish I could have taken more photos but really was nervous that someone would come out wondering what the crazy woman was doing.

{Upstairs} New Bedding


I wish I had remembered this BEFORE it was a dark, but oh well.

A couple of months ago, I bought new bedding from Target for our bed. We have had the same old comforters for a long time and although many were still in good shape, I was bored. I need to make or buy some duvets but I saw this dark grayish silver and had to get it. Sorry for the late night photo and that it's from my iphone, but that's real life people.

I finally bought two king size pillows to fill the shams. We are still using our regular size pillows. I'm a picky pillow person. :) The large chocolate brown pillow is a body pillow and our white furry pillow has been on my lust list for a long time now. I finally had to buy it when Target had it on sale awhile back. My friend noticed it and laughed, knowing how much I loved it while shopping with her.

Look at the face!

{Home} Before Photos

At Lily's birthday party today (pics to come), I realized many people in our family had never seen the before photos of our house. One of my friends said that I should make a coffee table book. That would take some more time and finding the old photos of everything, which I'm hoping are on my old computer. But anyway... here are some photos from the house before I got my hands on it!

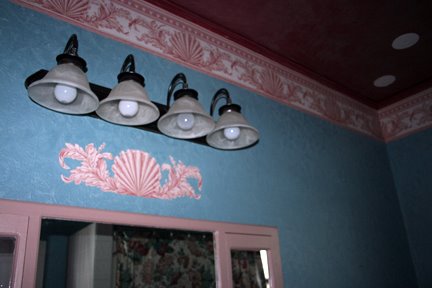
BEFORE - the hallway bath. Brick red ceiling, aqua blue walls, shell border around ceiling and cut out detail, pinkish tan painted trim, tile halfway up walls, wallpaper on ceiling.

BEFORE - old bath area in front of window was converted to shower area too (with the new "wall" to house shower pieces.

BEFORE - bathroom - circle medallions match those found in dining room (all cut out of larger wallpaper pieces).

BEFORE - columns in living room. Two tone with glaze.

BEFORE - living room into dining room (house is a mess while painting started). The living room had already been painted, dining room is still a dark red.

BEFORE - dining room side was solid brown with glued on decals.

BEFORE - living room - "antique" (according to previous homeowner), wallpaper (that's the sheet that was cut out for all borders and circle medalions), corner pieces from wallpaper, hand painted border (wallpaper), dark red (with black glaze) walls, brownish ceiling.

BEFORE - dining room - just another shot of the darkness and random details.

BEFORE - dining room - showing off the hand painted (NOT by me!) wallpaper border.

BEFORE - that's a lot of work - glad it didn't take much to remove it all!

BEFORE - dining room - wallpaper on trim. Why?!?!

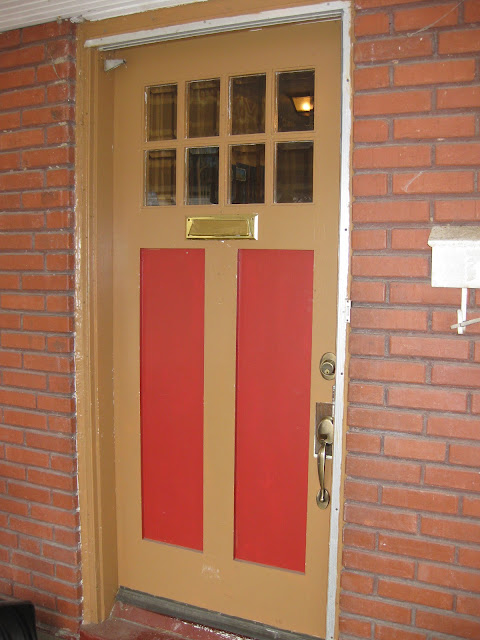
BEFORE - door. The true before would show the old hardware, but we replaced that for a new lock and dead bolt within weeks of moving in. Security first people!

BEFORE - kitchen - OMG was this bad! And yes, those are grapes that are climbing up to the ceiling.

BEFORE - kitchen - oh the green ...

BEFORE - kitchen - up close - and in progress, the black is just a temporary fix until we can afford a true makeover
BEFORE - Lily's room - two closets, poop brown trim, stenciled gold medallions

BEFORE - Lily's room

BEFORE - Lily's room detail of the stencils on the walls

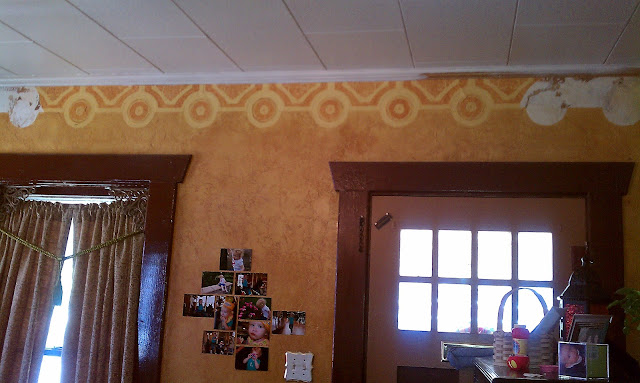
BEFORE - living room - dark brown trim, mustard walls (with glaze), wallpaper (hand painted again), two color door, "ornate" (?) switch cover, dark green curtains with tassels.

BEFORE - living room - wall paper on ceiling

BEFORE - living room

BEFORE - living room - trim on bottom and top of walls. Green thing with strings is the curtain and the tie back (that's looped up so I can start cleaning and removing wallpaper).

BEFORE - living room - window decorations

BEFORE - fireplace

BEFORE - living room - more wallpaper!

BEFORE - upstairs office (look at the belly!!!)

BEFORE - our garden area

BEFORE - was after - of garden area (and also pre-fence too)

BEFORE - upstairs - two different colors of trim, wood trim everywhere (instead of properly finishing drywall), wood paneling on vertical surfaces

BEFORE (kinda) - upstairs. This shows teh color, wood trim, stair carpet, brick walls that were on all four eaves

{Dining Room} Bye Bye Bi-fold

A couple years ago, my dad built us a custom made baby gate for our stairwell to the basement. We originally had a bi-fold door on there but after an attempt at keeping the dogs in the basement, Zoey found out that she could bust through them. She ended up breaking it and I wasn't upset at all. Those things are terribly ugly. But, once we had a crawling baby on our hands, we needed something. After an attempt at buying a pre-made one that ended up broken and messed up before we could do our own damage, we decided to do something more permanent. My dad had just finished making one for his stairwell due to the extra wide size of theirs. So, we decided to have the same thing. Here's what it looked like before I painted the walls and added some decoration (ps. this post shows the trim before I painted - with the wallpaper circles removed).

It's sad to say that we lived with the set up below for a long time. I don't know why but I guess we just weren't that bothered by it and we were into other projects at the time. But now that we're close to having a lot of people over, and how I'm trying to make the rest of the house look nice, it was time to deal with the situation. So I took it to one day. It was the same day I painted the hallway. I still am in love with the color.

As I was touching up the trim paint in other areas of the house, I knew I needed to deal with the horrible issue from the previous homeowner. You can see in the picture below with what I'm dealing with. The previous homeowner cut out circles from a patterned wallpaper and glued them (and then painted over them) on the trim in the dining room. I have since removed all of it, along with the border, but am left with rings of paint. I thought I had sanded down everything but this door frame is the last one to go. I should have sanded it down before the photograph but you can see just how much I've dealt with in this room (and house!). The photo below also shows the color of the dingy white trim vs the newly painted trim (if your monitors allow) and the fact that there were yellow spots in the trim from not being primed and so much more. Her (the previous homeowner's) painting skills were definitely lacking! She had creativity... I guess... but she had some issues when it came to paint. She would touch up items on with a different sheen of paint so you'll walk into a room and see a spot that sticks out. Flat on eggshell of vice versa. Just enough to be annoying!

Anywho... let's get to the pics. Here are the BEFORE shots... (or maybe in progress as Zoey took care of the actual true before shots with the door and all). Plus, if it was a true before shot the wallpaper would still be there and the walls would be dark red. Now I'm off to go find some of those photos...
What it looked like before the removal of the track.

You can see in the picture below where the hinges went for the door (that was removed for painting). There are there screw holes on top and three in the brown square towards the bottom. We had to remove the quarter round in order for the door to swing all the way open, allowing us and the dogs to get through without problems. Our laundry room is in the basment and it's nice to have the door open wide enough for baskets and us to fit through.
Part of the quarter round had to be removed when my dad installed his custom built baby gate for our stairs (to the basement).
Another shot of the whole set up.
Detailed view.

Here's what it looked like without the track. And yes, that's dark green paint underneath the white. Someone really liked green in the house before us. And there's a nail that's stuck. Either the head was broken off or it's somehow stuck in backwards (sharp side out). It's impossible to grab with a hammer and so it'll be a job for Doug to do when I get around to putting the second coat of white paint on. 
Underneath the door frame once the track was removed.

Stay tuned for the finished product. It needs another coat of paint, some sanding, and that nail to be removed. I've already reattached the door just for safety issues. I know Lily understands not to go to the basement without us but I'd hate for something to happen. I'm a worrier. 

{Hallway} Tall, Teal and Beautiful

Yesterday I showed you my inspiration for the house but I didn't tell you what I was going to do with it. It will be for the majority of the house but the main two rooms you see as soon as you walk in (living room and dining room) are already painted and I am NOT doing that again any time soon in there, I wanted to add a punch of color some where else.

Enter my hallway. It's not much of a hallway, but more of a small area where four rooms branch off from - the dining room, bathroom and two bedrooms (Lily's current room and what I continue to call Lily's future room).

I hadn't touched the hallway since we moved in other than to strip the paint off of the bathroom door frame when I painted the bathroom years ago. It took a lot longer than expected and still didn't give me the look I wanted, although beautiful wood. So it stayed there as is.


BEFORE
BEFORE - door to left is Lily's current room, opening on right is to dining room.
BEFORE - with our semi-nonfunctional door bell (as in it only works some times and isn't loud enough to hear through the house, but I found out why after taking it down).
Progress!
Coat #1. Door to the left is to Lily's future room, open door is to the bathroom (obviously).
First coat. See that horizontal line on the left? It's a bump out area that was added later to allow a vent to go upstairs. I'm thinking of putting a frame above and below it to distract the eye.
Second coat.
First coat done, shot into the bathroom and Lily's current room. You can see that I've started painting the trim to the bathroom as well. It's the same white that I've painted all the rest of the trim in the house I've repainted (living room, dining room, the upstairs).
Dark - it was late and it's a tough corner to capture.
It's not done yet - I still need to fix/buy a new doorbell, finish painting the trim to the bathroom, paint all three doors (that'll be a bigger job for later), and hang up some items. I also want to paint the light fixture too. But it's definitely a big change!!! We'll see what my family thinks about it this weekend when we have Lily's birthday party!

The color is Ocean Soul in Valspar at Lowe's. It's paint and primer in one and went on extremely well! And isn't that name great?!

Partying at...


LinkWithin

Related Posts Plugin for WordPress, Blogger...