{Lily}

I know many of you loyal readers (hi to both grandmas!) want to see things other than our house... so here goes! These are from a few outings this week...


{Home} The Hall Bath BEFORE

I realized I've mentioned the bathroom that I repainted before on this blog and put a link to the other blog, but I figured it'd be easier to put it on here. So here is the terrible bathroom. This was the first room I painted when we moved in and I forget how horrible it used to be!

The ceiling had both a texture and an odd paint job. Plus those white things are circles cut from the textural wallpaper that were also on the trim in the diningroom, similar to the trim on the front door, and from the same wallpaper that I removed from the living room and diningroom. Can you say too much?!?!
The shower curtain may have been the first thing I threw out. Yes, I threw it away. I could have given it away, sold it maybe, but there is something theraputic about throwing away something so ugly. If this is your style, I'm sorry. But it is NOT mine and I own this house!


Here you can see the wallpaper border, the shells she cut out to put under the lights, the teal wallcolor (it's painted textured wallpaper), and weird pinkish-brown painted trim.


The AFTER photos are not saving correctly to the computer, so I'll work on it. Or take new ones if necessary. We kept everything in there, except the wallpaper ceiling medalions, border, and cutout shells (the textured wallpaper that covers most of the walls is still up but painted). We have big plans for this room but as always, it requires money and some time, plus an electrician, plumber, and some construction. We want to knock down the wall with the mirror on it, expand the room into the closet of the bedroom next to it, move everything around, add a closet, tear out the tile, replace the window with the same as upstairs, and all the cosmetic work too (as in decor items).


{Front Door} Mail Slot

Ugly door alert!!

I have no idea what was with the previous homeowner and her color choices. You've seen the living room, the dining room, the kitchen, the bathroom, and even the upstairs was ugly (before we remodeled it, unfortunately I don't have good before photos).

The front door is no exception. The front is a horrible two tone paint job and the caulking is all cracked around it, she did a sloppy paint job (it's on the bricks in some places) and she never took the screen door metal pieces off even though there's no door. There were random nails everywhere in the door. I only used one when/if I hang wreaths. There are two hooks above the door that I'm guessing held some sort of a sign. AND that's just the front of the door.

The back of the door held more unused hardware (apparently there was a curtain rod over the windows at some point). The hardware for the hinges looks original and has some fun details, so it'll stay. But the hideous brass mail slot had to go. We didn't use it (you can see the needs-to-be-painted-mailbox in one photo) and we had a towel shoved in it for years. Yes, years.

My dad has been wonderful in helping paint the chocolate brown trim in the living room to a bright white and the door definitely got included. The inside side of the door will be white but I have plans of painting the front (outside) of the door black. Yes, black. I know many people don't like it but I think it'll look good with the brick, the white and black on the porch and rest of the house, and with accessories throughout the year (seasonal wreaths, etc).

So, since I've described it - here are the pics.


As you can see above, the baby poop brown color and a red just isn't doing it for me. Do you notice the brown rectangle behind the door handle? We added new hardware years ago when we added a deadbolt. We upgraded to a pretty handle instead of the small, old brass one that was there. However, the brass one was set into a brass rectangular plate that didn't fit the new hardware, so it had to go. And yes, we've been living with it for years. Some things just are easier to live with... especially because we were busy doing everything else in the house, and we can't forget the biggest reason for taking our time - Lily.


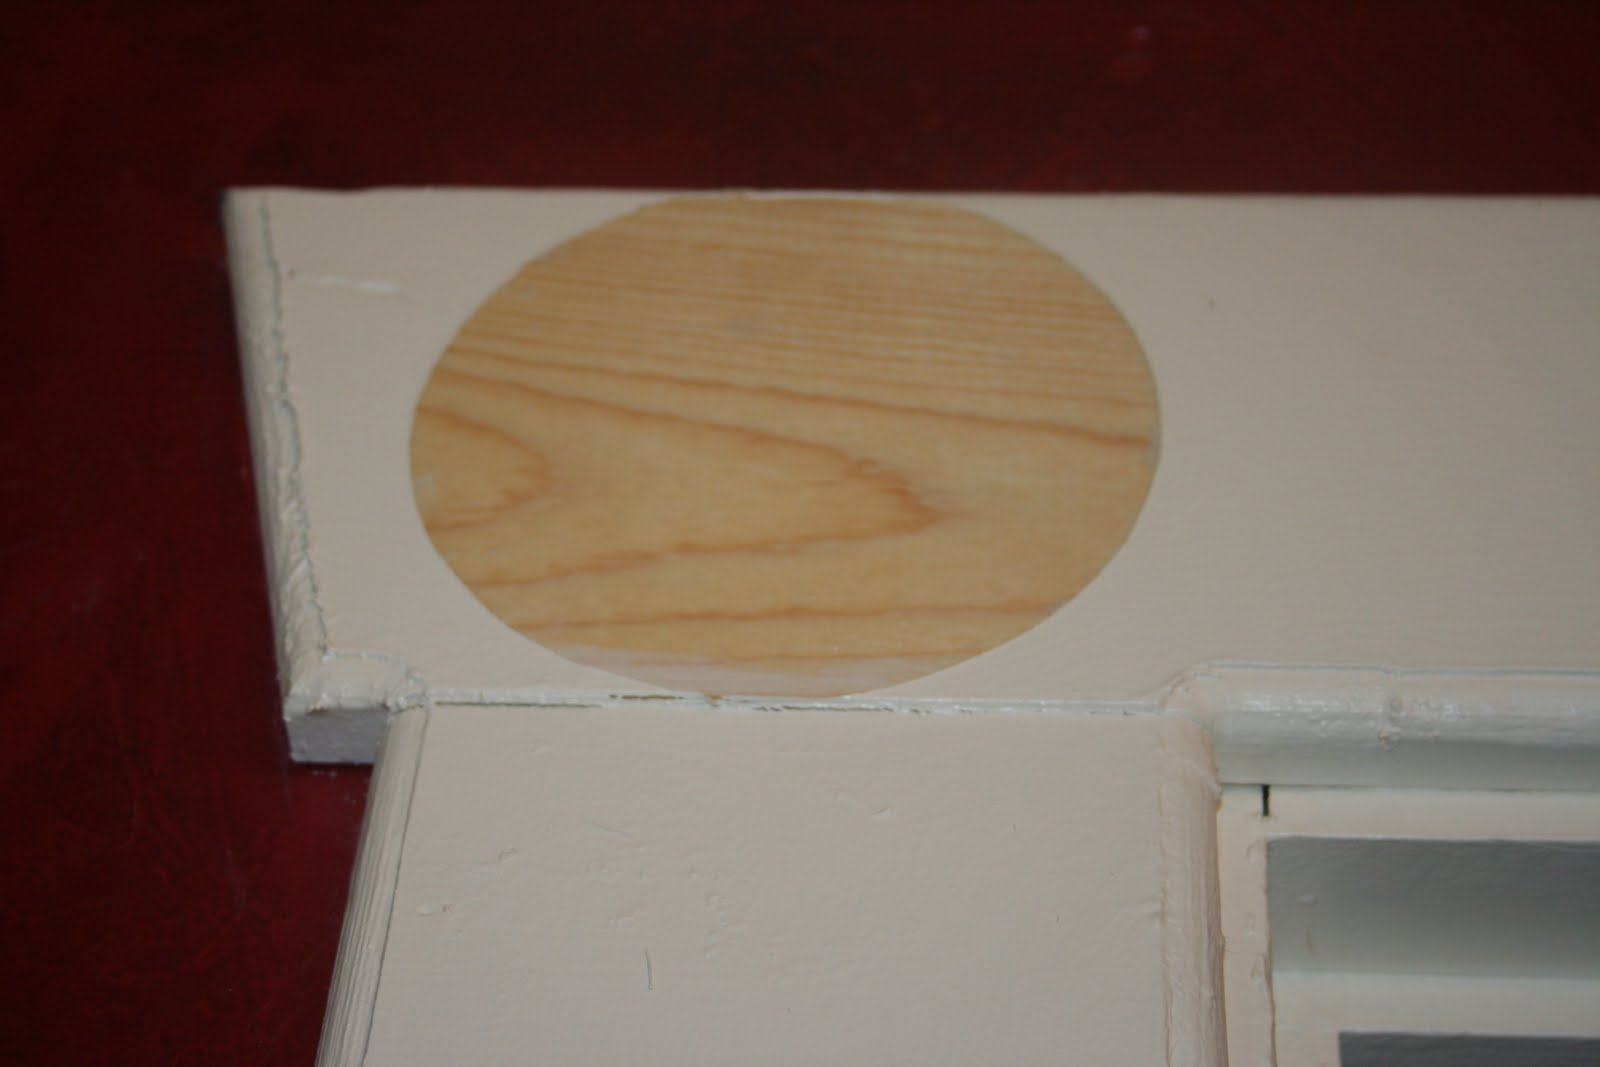
Here's a close up of the front of the door. My dad, the wonderful, talented handy man, made the block of wood and sanded it down in sections to custom fit the hole. And let me add that whoever put the mail slot in the door cut it out with a hand saw and was not even, which meant more work for my dad. The white around the oval is from him sanding everything to make it as smooth as possible. You can see two of the four screw holes that held the brass plate in the door. Above the oval was one more screw that my dad took out that I'm assuming held a wreath or decorative item at one point. It's now gone.


Here's the inside shot. You can see the baby poop brown continued but has since been covered up with the white to match the baseboards, windows, and columns. Notice how you can SEE through the door around the mail slot? My dad fixed that with putty. And not just any putty, the dry kind you mix with water and works wonders. He filled it in as much as possible to ensure that the new piece of wood stayed put. He then sanded everything down and put a coat of primer on it.


The door is not finished yet. We don't have a storm/screen door for this door yet and so we don't want to take it off to finish painting it. We want to take it off, sand it where necessary, and let it dry before putting it back on the hinges. We will probably wait until fall as it's over 100 degrees here in Missouri with a super high heat index.

Flowers

My lilies are in full bloom in the Lily Garden and are looking great!!! I can't wait until next year when even more will be blooming. After being planted only last summer, they need extra time to grow before producing many flowers, if at all. Some haven't done anything but luckily some have produced beautiful flowers!

The first one is the Gordon Biggs -


Not sure about the other names, I'll get 'em some day!

{Living Room} Fireplace


I am still looking for some missing photos but this fireplace used to be red painted brick, brown wood with gold dry brushed on top of the brown. I'll keep looking... for now, it's all white. Two coats of primer, three coats of paint. I'm doing one more to help even it up just some more!

EDITED... FOUND THE PICS... here ya go!

This photo was from a few years ago but it's how it's looked the whole time, with some minor details changed (candles normally sit in the fireplace).


And here it is as I painted the walls. My next job in this room (once the trim is all painted) will be the INSIDE of the fireplace. It's not a workable fireplace right now, so at some point I'd like to have someone look at it to see what it would take to fix it and also I'd like to paint with heat resistant paint on the inside (after a good cleaning!).

{Living Room} Progress

Wow, our house has undergone some changes recently! It's amazing what paint can do!!! 


If you're on Facebook, you've seen this photo, but I haven't blogged about it yet.

My dad was super helpful last week and once the walls were the new color, he knew I couldn't stand the brown chocolate windows. He couldn't stand them either! So he came and helped paint them. Well, he painted them while I painted the dining room. He also caulked the windows too. We don't use them because there's no screens for them, so he caulked them all up so we lose less air. Isn't that nice?

The one in the pic that's brown is actually now white. They all have two coats on them (I think) but will need another. The door is next. We're thinking this week will see that happen, but I'm not positive.

Wallpaper Removal - On Trim!

I've removed a lot of wallpaper from this house and this is just one more case of how annoying wallpaper is... and how the previous owner was obsessed with wallpaper. It's been everywhere - walls, on top of other wallpaper, ceilings, and on trim. This is a case where it was on the trim work. But unlike before, she put it on BEFORE the trim was painted. Talk about a big pain!

Here's the wallpaper on the dining room trim (around the doors and the window)...


Here it is after I took off the first later of wallpaper (that included probably two coats of paint too).


And this is what I'm left with...


There is a nice circle of dry paint on every spot I took the circles off from. I'll get the joy of sanding the trim work before priming and painting. More work, yes, but at least the wallpaper is gone from one more room!

{Dining Room} Painting Power!!

This is a shot of my diningroom - ceiling, wallpaper, and horrible colors - all in one! See those odd shape white pieces? That's wallpaper. So is the white shape in the top left. And, of course, so is the border on the red walls. The white in the bottom right corner is part of the trim to the basement stairs. That's a different post.

Another shot of the weird cutouts and the white wallpaper on the ceiling.


And a close up for those really interested. It's textured. Luckily, it comes off with just some water and elbow grease!


It's all the same wallpaper actually. She (the previous homeowner) bought rolls of the crap paper and put it as is on the dining room ceiling in a rectangle but got creative when she cut out the borders for the living room and dining room. The living room had the rounded side cut out (as seen in some of the pics) and the dining room had the opposite of the round (the semi-plus sign pieces).

It'll all be gone soon! I started pulling off the wallpaper today... just stopped to sit down for a minute, check my school work, clean, run errands (including buying paint!!), and pick up Lily. I also stopped because it went behind my large buffet/china cabinet and the whole thing needs moved to paint so I'll do that tomorrow.

Wish me luck as I continue (with the help of my dad - woo hoo!!) the painting extravaganza that I'm on.

After all of this is done, I will have painted five rooms on the first floor and the entire upstairs. I'll then be calling it quits until we tackle the front bedroom at some point in the future.

The Columns

Ugh... this is what I've stared at for the last 3 years when I'm in my living room. I have NO idea why I haven't done something about it before... but there have been other things on my mind since July 2007... like the upstairs remodel, our backyard, and of course, all things Lily!... so, of course my mind has been on many things (and that doesn't include working full time, going back to school to finish my teaching certificate, starting and continuing my master's degree in education, and so many other things.

But finally, I have gotten to this mess...


This shot shows the red (and more wallpaper!) in the dining room as it looks into the living room... but the above pic is the living room side (it's the gold side, the brown side was in the dining room).


Here's what it looks like without the glued on decals... they were NOT my style!


AND... drumroll please... it is primed!


The entire thing (both sides) is primed and I had started painting the first coat of semi-gloss trim paint when my parents asked me if I wanted a lunch break. So yes, I went out for lunch and then I got sleepy, took a nap, and haven't gotten back to the project. That's tomorrow's job!!!

Also on the agenda for tomorrow... to put the first coat of paint on the fireplace (yes, I primed it all today too!) and the second coat of trim paint on all the baseboards. I'll post more pics tomorrow of that!


Showing off at...
The DIY Show Off
UndertheTableandDreaming

The Columns, in progress

So here are the "columns" I posted about earlier... Don't judge me by my clutter! I swear it was clean a week ago for Miss Lily's party! But this is what happens when you are in the process of painting one room (where two of those tables go) and then there's the mini fridge from your in-laws that was once your hubby's that needs to find a new home... preferably not in the middle of my dining room! And then there's the table full of junk, the couch full of stuff too, and my two shadows... Rocky, the cat, and Zoey, my pup! But focus on the woodwork... the DARK brown, the random spicy mustard color inside, the glued on crap decals. I tried finding a true before pic that would include both the wall color and the brown trim, but I couldn't (except in the background of a Christmas pic but it didn't show much). I'll keep looking! For now, here's the in progress pic!

Living Room


Above is a picture of the finished wall and the finished ceiling... for some reason, I never got around to finishing the paint color on this side of the moulding. The whole ceiling could use a second (or is third?!) coat of paint, but that is the LAST thing I want to do right now! But isn't it nice looking?! I can't wait to add some picture ledges over the couch and to hang up the framed pictures again. I also need to move the furniture back in place, but I have to finish painting the trim before I do that!

Progress

I sanded and primed (first coat anyway) of what I am calling our columns that go between our living room and dining room. I'm waiting for the paint to dry or else I'd be painting the second coat of primer.

Next on my list is the fireplace. I SHOULD have sanded it while sanding the columns but I didn't even think about it. I swear I have a one track mind most days.

The baseboards in the living room need their second coat of paint but seeing as how I'm going to be painting other wood in the room, I'm waiting to just do it all at once. IF I have enough paint. I may have to go buy another gallon, and if I do, it'll have to wait until I have money.

Speaking of money, and buying paint, I have decided to go ahead with the dining room - IF Lily can go to daycare all of next week too. I've decided it takes roughly a week per room. Why so long? Well.. there's the time it takes to peel off wallpaper, prime the walls (which I will definitely have to do to cover up the DARK RED!), paint two coats, and I need to repaint all the white trim (after peeling off more wallpaper that is on the trim). The white trim in the dining room looks dingy after seeing it near the white trim of the columns. I also have to sand some of the door frame going to our basement because of the gate that was installed for Lily's safety. So, I figured that would take a good 4 days to complete. Add in laundry, moving furniture around, breaks for lunch (a girl's gotta eat!), and maybe a sanity break and/or nap in there, and that's a full week's worth of work! BUT oh, it would be AWESOME! Good thing I have a gift certificate to the local hardware store so I can spend it on paint. :)

After the living and dining rooms are painted, it'll only leave three rooms in our house (plus the basement, which I don't count) the same color as when we first bought the house. One is the room near the kitchen where the fridge is, one is the TV room, and then there's the front bedroom. The front bedroom is definitely on my list but it's the first on the list to be torn apart, not just repainted, so I'm saving my time, energy and money until we have enough money to replace the two windows, add insulation, and so on as mentioned in this previous post.

Now it's back to painting...

{Play Yard} Swing Set


Thanks to my parents, we now have a swing set in our backyard!!! The frame, two seats (one baby, one regular), and the time, energy, experience, and wonderful-ness was a gift from my parents for Lily's 2nd birthday! We had a few people contribute to the fund, so that will go for the purchase of a third swing and will be saved for next year's addition to it - a playhouse and slide combo (well, that's what I'm planning now!).

It is awesome! My parents came over Sunday and got most of it built except we needed an additional tool to complete it for the swings, so Dad came over today to finish it. It is soooo great!! Lily saw it today from inside the house and was like "wow! swing!" Then she wanted to go outside!!!

Thanks Babby and BauPau!!

Living Room


I finally have ALL the original paint color covered in our living room! woo hoo!!! It calls for a celebration. The first coat of the paint is now up on all four walls and a second coat is about half way done. I had to stop for a lunch break and paint dry break too. I'd post BETTER pics but I can't find my cameras.... the big one may be in my car and the little one is MIA. So my phone will have to do for now.... BUT the color is better looking in person (for those that have recenly been to my house, it's the same color as upstairs).

After the paint is done, I have to finish the ceiling (yes, I should have finished that BEFORE in case of drips, but oh well!) and then there's the issue of trim... I'm going to paint all the baseboards white and I'd love to paint the three windows and the door too, but I may not have it in me. There is also the issue of the trim that seperates the livingroom and dining room... it'll go white too, but that's a lot of sanding, priming and painting! The good side of all of this is that Lily is at daycare the whole week, so if it's going to happen, this would be the time!

And because it finally opened today, here is a picture of my first lily of the year! It's one of the Asiatic Lilies from last year... there are a ton of buds on it and some on the other plants as well.

My 2nd Tattoo


A couple days after my brother passed away, I was sitting in class (yes, I went back to work - it allowed me to get my mind semi-off of things until family came in) and I started sketching random things. After a few other sketches of my brother's initials (JRJ if you're curious and yes, the J is backwards for design reasons), this one popped into my head. I worked on it and after showing it to family (and posting on Facebook), we decided to get the tattoos that Sunday.

Obviously, I got mine on my back. My cousin A got it on her wrist, cousin L got it on her foot, and cousin I got it on his arm. Mine was the biggest and the girls' are the smallest (about a quarter size maybe), I's is a little smaller than mine.

The design is going to be other places and I had also thought of doing those "in memory" stickers for cars... Anyone know where to get them? I wouldn't put his name on it, I don't think he'd like it, but the people who know would have something for him and the people who don't know would just see the design.

It's definitely not the 2nd tattoo I had in mine when making up my list. I had thought that would be the one I want for Lily or even my koi but this one is super meaningful and it was a nice experience to go through with my cousins. Some day, when we see each other again, we'll get a photo of all of them together now that they are healed.

Operation Wallpaper Removal, part 2

Here are the pics... I have some more as a semi-tutorial for ya (if you desire one), so those are for the next post. This is the corner of the upper part (you can kind of see the moulding)... I actually found some original (or super old) wallpaper underneath for the first time ever in this house... You can kind of see it in the middle of the pic (you may have to enlarge it) - it's the stripes and a slight floral pattern to the left of the stripes.

Why so many colors? The white is the unpainted plaster that was hidden underneath the wallpaper, the offwhite is some paper from the wallpaper, and the darker colors are from the original (I'm guessing) plaster or paper from the plaster. It was a mess!


You can see the stripes more in this photo from the original wallpaper.


A wide shot...


Cleaned off and primed!


And there you have it. I'll hopefully be finished tomorrow. I'm only removing the paper and painting though - the trim work will wait until next week. I've decided to only paint the trim on the floor and leave the windows. I may paint the trim around the door but I'll wait until I paint the door later this summer. I REALLY want to paint the mantel and fireplace but I can't decide on a color yet. The fireplace/chimney needs some TLC (in the form of a professional) but I may still paint the inside and surrounding bricks a dark color and the mantel a lighter, brighter color (sky blue, perhaps?).

Operation Wallpaper Removal


OK, so I was going to post all the photos on here that I've done so far but Blogger is having issues and I don't have patience anymore. Sooo... this is what you get for now. I'll post more later.

The wallpaper has been up since we bought the place and drove me crazy ever since. I finally have the upstairs finished enough (well... kinda...) that I'm going to focus on the first floor for a minute or two. I had actually started this project two months ago on my Spring Break to see how easy it would come up. It hasn't been a trouble at all, similar to the rest of the wallpaper in our house. Can you believe I've taken wallpaper down in the bathroom, living room, kitchen, and bedroom? I've taken it off of ceilings (yes!), walls, wood trim (seriously!), and on top of textured wallpaper as well. The previous homeowner was a little crazy!

My tip to wallpaper removal, at least so far in this house, has been simple. I pull off the top layer, wet the paper underneath, let it sit, and peel it away. It takes awhile depending on how much glue was used but today it's been easy. I was done with two walls, top and bottom borders (yes, one near the floor and one near the ceiling) in less than 2 hours.

Then comes the boring part - primer and paint.

The first coat of paint is up, so I'll let it dry, put the second coat on, and then take pics for ya. It may need a third coat but I'm not sure.

It's the same color as the upstairs, if you're wondering. Monroe Bisque. Very pretty, simple, light, and soooo much better than what was there!

LinkWithin

Related Posts Plugin for WordPress, Blogger...